Designed and built exclusively for Santana, the Airliner SafeCase is a tough vault-like case with thick foam layers, interlocking edges, full length hinge, locking hasps and industrial strength casters. Size: 84x70x40 cm
Video: Disassembling a Santana eSCape Tandem
Video: Packing a disassembled Santana eSCape tandem into the Santana hard case (Airliner Case) for transport by train, bus, car or plane.
Video: How to pack a fully equipped Santana Touring Tandem in the Airliner case.
Required tools
- 4, 5 and 8 or 10 mm Allen wrench
- Pin-spanner tool to tighten the chain if necessary (e.g. Park-Tool SPA-1)
- S&S coupling wrench (no longer needed with the new Z-couplings)
 Download manual
Disassembly
- If the tandem is equipped with extras such as racks, lowriders, mudguards or bottle mounts on the stoker lateral tube, these are removed first.
- The first step is to disconnect the shift cables and the rear brake cable at the cable couplers under the bottom tube. To remove the tension from the cables, it is recommended to switch gears to the smallest sprocket at the front and rear.
- Then remove the barrel adjuster on the down tube (unscrew them on older models) to adjust the cable. separate the cables from the frame. If the tandem is equipped with an electric shifting system, only the plugs on the head tube, respectively at the display and on the captain and stoker bottom brackets are disconnected.
- Now the captain handlebar is separated from the frame.
- To do so, first unhook the front brake (V-brake) and unscrew the brake caliper, still attached to the brake cable, with a 5 mm Allen wrench. Then screw the screw back into the thread to avoid losing it. Alternatively, the brake cable can also be loosened from the brake caliper by unscrewing the 5 mm Allen screw (Note: When reassembling, the brake may need to be adjusted again). For a caliper brake, the brake caliper is loosened and the sleeve nut (5 mm Allen) on the back side of the fork crown is unscrewed in succession the entire brake caliper.
- To remove the handlebars, first loosen the stem bolts (4 or 5) on the side of the steerer tube and then remove the headset cap by unscrewing the center 5 Allen screw.
- Afterwards, screw the cap of the headset back into the steerer tube to avoid losing it.
- The handlebar bolts (4/5) on the disassembled handlebar can be loosened so that it can later be placed flat and space-saving in the case.
- Now the tandem is flipped over so that it stands on the saddles, while the handlebar of the stoker keeps the tandem from tipping over sideways.
- Next, remove the front wheel and the rear wheel by loosening the quick release/ thru axles. Remove the quick release from the wheel hubs, as these will be packed separately later.
- Loosen the cranks of the timing chain with an 8- or 10-mm Allen wrench. The chain and the belt are removed at once. Tip: with the belt drive, the position of the cranks on the belt and the belt blades can be marked with a colored marker pen. This makes it easier to find the synchronized crank position when assembling.
- Then remove the cranks on the other side.
- The chain can be left on the frame. However, the chain stay should be protected from paint scratches with a protective pad and the chain should be fixed with 2-3 more Velcro pads. If a carrier is packed, the rear derailleur must be removed from the frame. If knowledge with chain locks are available, SRAM, KMC or Shimano 11-speed chains can also be disassembled.
- Now the frame is separated at the couplings. For the new Z-couplings, only a 5 mm Allen wrench is needed to release the couplings, while a special S&S wrench is needed for the older S&S couplings.
- First remove the bottom tube out of the tandem frame by loosening the 5 mm Allen screws on the underside of the bottom tube until it can be removed from the frame.
- Then loosen (the lateral) and the top tube at the couplings on the side of the captain seat post. The front and rear sections can now be separated.
- Finally, remove the remaining couplings from the rear frame.
- Remove the captain and stoker saddles, including the seat posts. (Tip: Mark saddle height with a marker on the saddle tube attachment. This save having to adjust the saddle height when reassembling later).
- Now the handlebar of the stoker is loosened from the stoker stem with a 5 mm Allen wrench. (Tip: The position of the handlebar can also be marked with a marker. This save having to readjust the correct handlebar position when reassembling). At the removed handlebars still loosen the handlebar bolts, so that it can be stored flat and space saving in the case.
- Now the packing into the tandem case takes place. First, remove the foam layers 2-6 (these are numbered at the top right).
Packing into the Santana SafeCase
First remove the foam layers one by one and place them on top of each other. The bottom foam layer (1st layer) remains in the case.
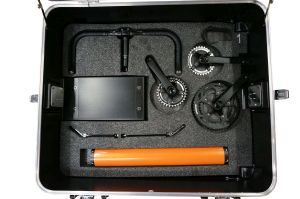
Layer 1
- Bottom tube (+ lateral tube)
- Quick release / thru axles front and rear
- Stoker handlebars
- Stoker cranks and the left captain crank (SPD pedals do not need to unscrew).
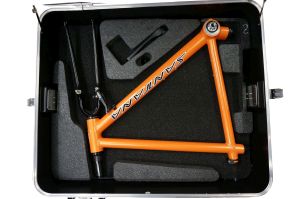
Layer 2
- Captain crank
- Place the captain frameset with the fork facing upwards (if necessary, pad the right brake caliper so that the down tube does not get scratched and put a protective cap on the bottom bracket axle facing upwards).
- If the tandem is equipped with a rack, this is now inserted with the left side at the lower end, under the foam of the 2nd layer, while the upper side of the rack rests against the edge of the case. The foam must be cut out at the required points for this purpose
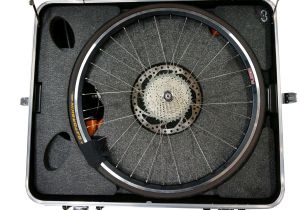
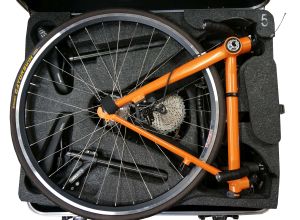
Layer 3
- Insert the rear wheel with the cassette facing upwards (with 32 mm tires, the air must be released).
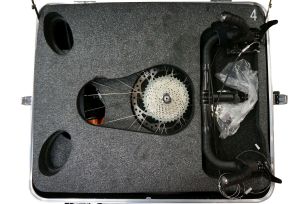
Layer 4
- The captain handlebars turned upside down with the stem previously loosened and turned 180°. Brake levers point to the edge.
- Roll up the cables and place them safely in the handlebar cutout.
Layer 5
- Place the rear frame with the rear derailleur facing down. Pad the cassette towards the chainstay and, if necessary, rotate the rear wheel underneath slightly so that the rear derailleur finds room between the spokes.
- Captain and stoker saddle
- Push the front wheel with released air into the rear frame (like installing the rear wheel).
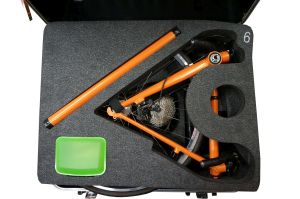
Layer 6
- Top tube
- Plastic box with tools (a belt can be placed loosely in the case).
- Optional: place lowrider in a recess previously cut into the foam in the upper left corner.
Packing with no FTS add 15 minutes: Wrap the tubes with the including material at all contact points.
- Place the tandem frame's front triangle in its case with fork turned inward.
- As this, and each following layer is added, wrap and pad as necessary.
- Place the rear triangle with rear wheel with rear deraileur down (padding) on top.
- Place all parts, seats, handlebars, tubes, cranks where convenient. and place the foam on top
- Place the front wheel on top.
How does the assembly work?
Illustration with 4 Z-couplings aluminum